Introduction
The sliding window analysis viewer (SWAV), is a web-based program to integrate, view and browse sliding window test statistics and genome annotations. With this application, users can visualize and rapidly release segmental or whole genome test statistics on the web. SWAV speeds up the manual check in sliding window analysis and facilitates the drawing of statistic images. Users are suggested to install SWAV in an environment with Linux, Apache, PHP and MySql. Windows+Xampp is also possible. The background frame of SWAV follows MVC basing CI 3.1.9, and the foreground coding mainly ultilizes Amaze, TNT board, D3 and JQuery.
License
SWAV is open source and licensed under MIT and Apache 2.0.
System requirements
A suggested setting of the environment is a Linux server that has Apache 2.0 or later version, MySQL 5.0 to 5.2 , 5.3 or later version and PHP 5.0 or later version with mysqli module. Moreover, the environment need to fulfill the requirements to run BLAT and Blastn, e.g., the system needs to have libidn to support Blastn.
Preparation
Input files
| File | Format | Number |
|---|---|---|
| Reference genome | FASTA file | 1 per organism |
| CDS | FASTA file | 1 per organism |
| Genome Annotation | GTF or other format | 1 per organism |
| Test statistics | Tab separated format is preferred | 1 or more per organism |
Preparation of input files
Annotation
Users can generate the annotation mysql infile using Perl scripts listed below in the folder ‘install/scripts’,
| File | Format |
|---|---|
| GFF3 | swav_annotation_format_change_gff3.pl |
| GTF | swav_annotation_format_change_gtf.pl |
swav_annotation_format_change_gff3.pl INFILE OUTFILE
or write scripts to change the source annotation file into the format as:
| id | chr | type | start | end | strand | name | annotation |
|---|
Note: ‘id’ starts from 1 and can be increased by 1 each time. 'type' needs to include 'RNA','exon','CDS' and 'intron'. 'chr', 'start', 'end', 'strand', 'name', 'annotation' denote chromosome/scaffold name, start postion, stop position, name the transcript/gene, functional annotation of the gene/transcript.
Reference genome
In the fasta format file of the reference genome, the title of each sequence needs to be clean.
For example, “>Chr1” is correct but “>Chr1 length=12341412” is incorrect.
The names of the chromosomes/scaffolds need a one-to-one map to ‘chr’ in the annotation mysql infile.
We offered a script to process chr file swav_chr_formatting.pl
swav_chr_formatting.pl ORIGINAL_GENOME_FASTA_FILE OUT_GENOME_FASTA_FILE
CDS File
In the fasta format file of the CDS, the title of each sequence needs to be clean.
For example, “>YBR024W” is correct but “>YBR024W_mRNA cds chromosome:R64-1-1:II:289445:290350:1” is incorrect.
The gene name needs a one-to-one map to ‘name’ in the annotation mysql infile.
We offered a script to process cds file swav_cds_formatting.pl
swav_cds_formatting.pl ORIGINAL_CDS_FASTA_FILE OUT_CDS_FASTA_FILE
Chromosome length
Users can generate the chromosome length mysql infile using the Perl script swav_chrlen.pl.
swav_chrlen.pl -i INFILE -o OUTFILE
Test statistics
The mysql infile of each test statistic need to follow the format:
| id | chr | pos | val |
|---|
Here, ‘id’ starts from 1 and is increased by 1 each time. ‘chr’ is chromosome. ‘pos’ is the center of the test window. ‘val’ is the value of test statistics. Users need to transform each test statistic into the mysql infile format.
Installation
Step I. Initialization
Unpack the source zip file swav.zip. The structure of the folder is
| web | the web program of SWAV. Note: the hypertext access file .htaccess is at the root. You need to check if "AllowOverride All" is in the configure file of Apache. |
|---|---|
| install | scripts and sample files to install SWAV |
| swav.sql | the sql file to initialize SWAV database |
Place the content of “web” into the html folder of Apache or the appropriate position of the web service.
mv web /var/www/html
Step II. Configuration of database
Create a database named ‘swav’ in MySQL, execute ‘swav.sql’ to create basic tables and grant privileges of ‘swav’ to a account to master the database.
Change the config file ‘application/config/ database.php’ in the folder ‘web’. Specifically, find the following lines, and then set the content of each item as your setting in the mysql database for SWAV.
'hostname' => 'localhost or a IP address',
'username' => 'username to visit the MySQL database of SWAV',
'password' => 'password to visit the MySQL database of SWAV',
'database' => 'the name of newly generated SWAV database'
Step III. Setting the base URL
Users need to set the base URL at the file 'application/config/config.php' in the folder ‘web’. Find the following line as listed below and set it.
setting $config['base_url'] = 'The web address of your SWAV';
Step IV. Uploading genome information
Visit your SWAV site, e.g. myswav.org. Go to ‘setting’ (myswav.org/setting). The initial username and password is ‘root’ and ‘swav’.
Go to “Genome->Organism” and add an organism, e.g., saccharomyces cerevisiae. The sign of an organism need to be alphabetic, in lower-case without blank spaces, e.g., ‘scerevisiae’ can be the sign of saccharomyces cerevisiae.
SWAV offers scripts (in the folder 'install/scripts') to faciliate users to upload data. Before running the scripts, users need set the database connection config file 'conf'.
$mysql_database="THE DATABASE NAME";
$mysql_user="THE USER WITH PRIVILEGES OF THE DATABASE";
$mysql_passwd="THE PASSWORD OF THE USER";
The user of the database needs to have the privilege 'FILE'. If the user is not 'root', users can use the following commands in the mysql ROOT administration to add 'FILE' privilege.
REVOKE ALL PRIVILEGES ON * . * FROM 'THE UESR NAME'@'localhost';
REVOKE GRANT OPTION ON * . * FROM 'THE UESR NAME'@'localhost';
GRANT FILE ON * . * TO 'THE UESR NAME'@'localhost' WITH MAX_QUERIES_PER_HOUR 0 MAX_CONNECTIONS_PER_HOUR 0 MAX_UPDATES_PER_HOUR 0 MAX_USER_CONNECTIONS 0 ;
Upload the annotation mysql infile using the script ‘upload_annotation.pl’
upload_annotation.pl -c DATABASE_CONFIG_FILE -i ANNOTATION_INFILE -s SIGN_OF_A_ORGANISM
Upload the annotation chromosome length infile using the script ‘upload_chr_len.pl’
upload_chr_len.pl -c DATABASE_CONFIG_FILE -i CHROMOSOME_LENGTH_INFILE -s SIGN_OF_A_ORGANISM
Users can view the status of newly generated tables in “Genome->Gene model” and “Genome->Chromosome Info”.
To enable the search function, users need to move the fasta format genome file to the position 'res/genomes' in the web folder and rename the file in the format of [sign of the organism].fa
mv genome.fa web/res/genomes/[sign of the organism].fa
To move the fasta format CDS file to the position 'res/cds' in the web folder, rename the file in the format of [sign of the organism].fa, and make blast use database.
mv cds.fa web/res/cds/[sign of the organism].fa
../programs/makeblastdb -dbtype nucl -in [sign of the organism].fa -out [sign of the organism].fa
Step V. Add test statistics
Users can add a track in “Test statistics->Track list”. A single track indicates only one test statistic, while composite track indicates more than one test statistics.
If users newly set a composite track, they need to add subtracks in “Test statistics->Subtrack”.
The sign of the track needs to be alphabetic in lower-case and without blank spaces. The full name will be displayed in the main panel of SWAV. Track color is the color of the curves and points in the drawing of the test statistics. Track height is the height of the track image. If more than one track exists, ‘Rank’ will adjust their order from high to low.
Users need to upload track data to the tables listed in “Test statistics->Data”. The script ‘upload_indicator.pl’ in the folder ‘prepare’ functions to perform the uploading.
upload_tracks.pl -c DATABASE_CONFIG_FILE -i TRACK_FILE -t TABLE_NAME -p PARAMETER_STRING
The format of PARAMETER_STRING is [the first line to get information]:[column of chromosome]:[column of position]:[column of track value]
e.g., upload_tracks.pl -c conf -i theta.dom -t swav_indicator_scerevisiae_theta_dom -p 2:1:2:3
In “Test statistics->Cutoffs”, users can set lines of thresholds, which will be displayed in the main page.
the script get_cutoff.pl can help to obtain a designated threshold for ranking test.
get_cutoff.pl -i TRACK_FILE -c CUTOFF_PERCENTAGE -p PARAMETER_STRING
The format of PARAMETER_STRING is [the first line to obtain information]:[column of track value]
The threshold percentage is the percentage of track values in descending order
e.g., get_cutoff.pl -i theta.dom -c 0.05 -p 2:3
“Test statistics->Chg Password” is the section to change the password of user ‘root’.
Functions
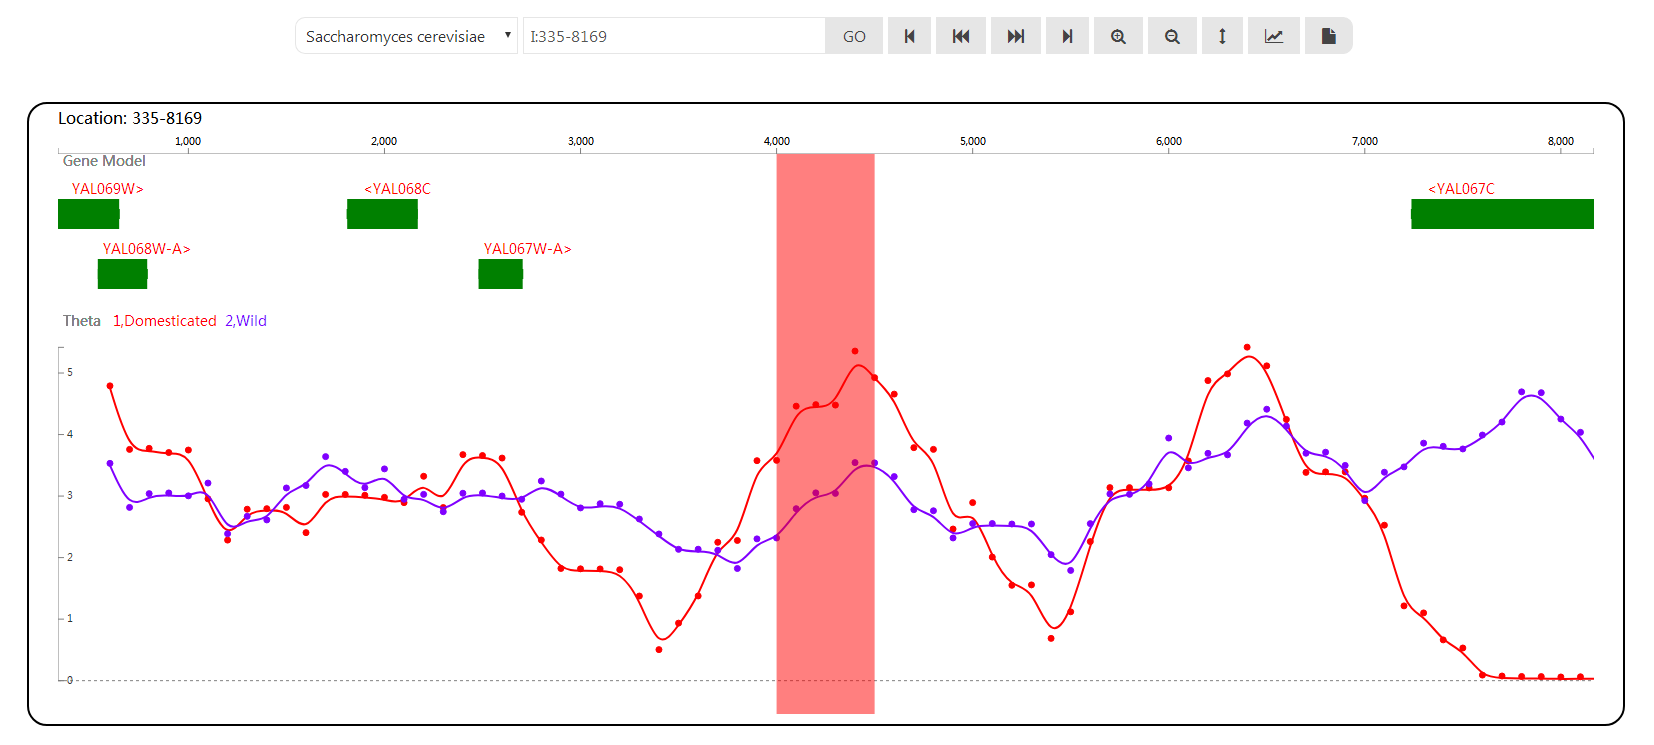
Browser
On the board, clicking on one gene model or one point of some test statistics, its related information is displayed.
Each test statistic may have one track (single track) or more multiple tracks (multi-track). For multitrack, track names are numbered and listed following the test statistic name.
Users can set one or more thresholds and display the threshold line in the main pane.
| Button/Inputs | Function |
|---|---|
| Choose an organism | |
| Set the position to view | |
| Direct to the view of selected organism and inputted position | |
| Move the genome position to the left | |
| Move the genome position to the left quickly | |
| Move the genome position to the right quickly | |
| Move the genome position to the right | |
| Zoomin the view | |
| Zoomout the view | |
| This button enables a user to set the focus bar. In the pop-up dialog, users can choose to draw a focus bar range from position X to position Y or not to draw a focus bar range. Users can set the color, position and width of the bar. | |
| This button enables a user to export the drawing of one track. In its pop-up dialog, users can choose to include or exclude gene annotation, threshold line or fitting curves, and to set the size of the generated image. The size of the image need to be larger than 1000*600. After clicking “Preview & Download”, a new page to preview the drawing is generated. Clicking one "Download" will start to download the image. | |
| Export one test statistic in the view in csv format |
Search
| BLAT/Blast | Users can BLAT a sequence or a list of sequences in fasta format to the genome of selected organism and view tracks in the region mapped to one query sequence. The query sequence will be in the color orange in the browser. Users can choose to include the query sequence in the generated image. |
| By Positions | After inputting a list of genome sites, users can obtain a list of links to view the tracks at inputted sites. |
| By Gene names | Users input a list of gene/transcript names and obtain a list of links to view the tracks of the list of genes |
Sample
Files
Files in the folder 'install/samples/' help users to build their SWAV.
| File | Description |
|---|---|
| scerevisiae.gff3 | The GFF3 format file of Saccharomyces cerevisiae from Ensembl |
| scerevisiae.gtf | The GTF format file of Saccharomyces cerevisiae from Ensembl |
| scerevisiae_genome.fa | The genome of Saccharomyces cerevisiae from Ensembl |
| theta.dom | This file is the result of Thetas, Tajima's D and Neutrality tests of domesticated yeast genomes (from PRJEB1973) by ANGSD |
| theta.wild | This file is the result of Thetas, Tajima's D and Neutrality tests of wild yeast genomes (from PRJEB1973) by ANGSD |
| clr.list.dom | This file is the result of CLR tests of domesticated yeast genomes (from PRJEB1973) by ANGSD and SweepFinder2 |
| clr.list.wild | This file is the result of CLR tests of wild yeast genomes (from PRJEB1973) by ANGSD and SweepFinder |
| fst | This file is the result of Fst tests of wild yeast genomes (from PRJEB1973) by ANGSD |
Pipeline
The following general pipeline can be utilized to perform population genetics analysis of 12 yeast resequencing genomes. For specifics, please refer to the manuals of Bowtie2, Samtools, ANGSD and SweepFinder2
1. Clean the download genome file
pure_chr.pl Saccharomyces_cerevisiae.R64-1-1.dna_sm.toplevel.fa sc_genome.fa
2. Perform alignment of fastq files and the reference genome
bowtie2-build sc_genome.fa index
for i in *.fastq; do bowtie2 -p 8 -x ../index $i -S $i.sam; done;
samtools faidx sc_genome.fa
for i in *.sam; do samtools view -bt ../sc_genome.fa.fai $i > $i.bam; done;
for i in *.bam; do samtools rmdup -sS $i $i.clean; done;
for i in *.bam; do samtools sort $i -o $i.sorted; done;
for i in *.sorted; do mv $i `echo $i | sed -e "s/\.fastq\.sam\.bam\.sorted/.bam/g"`; done;
3. Make two files dom.txt and wild.txt listing sorted bam files.
4. Perform Thetas,Tajima's D' and Neutrality tests
angsd -bam dom.txt -doSaf 1 -anc /genome/zhuzl/yeast/sc_genome.fa -GL 1 -P 24 -out out
~/bin/angsdfiles/angsd/misc/realSFS out.saf.idx -P 24 > out.sfs
angsd -bam dom.txt -out outdom -doThetas 1 -doSaf 1 -pest out.sfs -anc /genome/zhuzl/yeast/sc_genome.fa -minMapQ 30 -minQ 20 -GL 1
misc/thetaStat do_stat outdom.thetas.idx
misc/thetaStat do_stat outdom.thetas.idx -win 1000 -step 100  -outnames
misc/thetaStat do_stat outdom.thetas.idx -win 1000 -step 100 -outnames theta.thetasWindow.gz
5. Call CLR
angsd -bam dom.txt -GL 1 -out out -doMaf 2 -minMapQ 30 -minQ 20 -minMaf 0.01 -fold 1 -P 12 -SNP_pval 0.05 -doMajorMinor 1
gunzip out.mafs.gz
SweepFinder2 -sg 1000 dom.txt clr.list.dom
SweepFinder2 -sg 1000 dom.txt clr.list.dom
6. Call FST
angsd -b dom.txt  -anc ../sc_genome.fa -out pop1 -dosaf 1 -gl 1
angsd -b wild.txt  -anc ../sc_genome.fa -out pop2 -dosaf 1 -gl 1
angsd -b list1  -anc hg19ancNoChr.fa -out pop1 -dosaf 1 -gl 1
angsd -b list2  -anc hg19ancNoChr.fa -out pop2 -dosaf 1 -gl 1
misc/realSFS pop1.saf.idx pop2.saf.idx >pop1.pop2.ml
misc/realSFS fst index pop1.saf.idx pop2.saf.idx -sfs pop1.pop2.ml -fstout here
misc/realSFS fst stats here.fst.idx
misc/realSFS fst stats2 here.fst.idx -win 50000 -step 10000 >slidingwindow
Source
The latest version of SWAV is swav 1.0. Click HERE to download.
An Exemplary Website
We applied SWAV to 12 yeast and 35 silkworm resequencing data and as an example. Click HERE to view the exemplary database.
Applications
SGID Zhu Z, Guan Z, Liu G, Wang Y, Zhang Z. SGID: a comprehensive and interactive database of the silkworm. Database (Oxford) (2019) Jan 1;2019. pii: baz134.
ASFVdb Zhu Z, Meng G. ASFVdb: An integrative resource for genomics and proteomics analyses of African swine fever. bioRxiv (2019). doi:10.1101/670109.
CoVdb Zhu Z, Meng K, Meng G. A database resource for Genome-wide dynamics analysis of Coronaviruses on a historical and global scale. bioRxiv (2020) doi: https://doi.org/10.1101/2020.02.05.920009.
Please cite us using the reference listed below:
Zhu Z, Wang Y, Zhou X, Yang L, Meng G, Zhang Z. SWAV: a web-based visualization browser for sliding window analysis. Sci Rep (2020) 10, 149.
